Showing posts with label remodel. Show all posts

Tuesday, March 8, 2016

Master Suite Remodel - Finished Bathroom

Anybody remember how ugly and outdated our master bathroom was when we moved in? Sure, some people got excited by the garden tub, and there were definitely some updates done in the last decade or so, but in general it was really bad and impractical. Really, what's the point of a separate shower when it's less than 3'x3' and all of your bathroom real estate has been taken by a tub that's used maybe twice a year? And of course who could forget the toilet throne, a foot off the ground, separated from the rest of the bedroom only by a flimsy piece of textured glass? This was definitely a custom bathroom for a very particular person.


We certainly wanted to remodel this bathroom as soon as we walked into it, but as it was still functional and could have been much worse we just made a few small updates and were planning to wait several years and take care of some of the other larger house expenses first. Our plumbing piped up, "I think not!" and we just went for it to get exactly what we wanted while everything was getting torn up anyway. It turned out so perfect! Check it out!

We kept the sink in the same place but everything got replaced - sink, faucet, cabinet, mirror, lighting, granite countertop, hardware -- everything!

View from the bedroom

Dallas White granite

Super useful adjustable mirror, and it's pretty too!

Here's all of our new storage around the corner -- sheets, towels, extra toiletries, we can store so much suddenly!

Look! A toilet in its own room!

With a door!

That shuts!

And for the grand finale, our beautiful new giant shower! I'm incredibly pleased with how the tiling turned out since I never could really find what I had in my head anywhere online. I knew I wanted marble, but not too much marble, because it would be overwhelming in appearance and in cost. So what I came up with was marble subway tiles set in a diagonal herringbone pattern for the top 2/5 or so of the walls, plain old white subway tiles for the bottom 3/5ish, and marble hexagonal penny tile for the floors. Luckily, Nick trusted my "vision" and agreed that we could go for it. One thing we splurged on was a second showerhead, which really is totally unnecessary, but it would have been impossible to add later and we had the space for it so we just went for it. The double niches for our shampoos and things and dimmable recessed lights finish it all off beautifully. I love it!

Frameless glass door and transom to keep the steam in

Even the outdated glass bricks look nice in here, and I'm so glad we still have some natural light

Double showerheads, double niches 

For a quick recap of what's been done and what we still want to do in here (which really isn't much, for once!):
  • Remodel everything?? - obviously the remodelers did this for us
  • Paint walls Sherwin Williams Naval
  • Organize all the storage areas
  • Install a towel bar for hanging things to dry
  • Paint or wallpaper the toilet room

And in case you missed it, check out the demolition, total gutting, rebuilding, and tiling progress of the bathroom!

Monday, March 7, 2016

Master Suite Remodel - Finished Hallways

The only thing the contractors did in here was finish the baseboards that we started a year or two ago, but I still thought it was enough to warrant some new pictures! Plus I'm not sure if I ever posted after I stenciled the second wall in here. First, check out the before:

So much beeeeeeige
And here is where we are now, with our lovely tile floors and stenciled walls!

Finished baseboards

Same TTU football posters from before, back on the wall

Still in love with this stencil, especially with the baseboards!

The shelves don't look too bad without doors, but I still plan to have them closed off at some point

Here's the other wall that was stenciled

More of the second wall

And a couple more football posters. You can also see the magnetic wall on the side of the hall cabinet.

For a quick recap of what's been done and what we still want to do in here:
  • Paint walls Sherwin Williams Extra White (Satin)
  • Stencil walls with Sherwin Williams Escape Gray (Flat)
  • Tile floors
  • Replace scrawny baseboards - remodelers did this for us
  • Paint side of cabinet with magnetic paint for magnetic poetry
  • Hang art
  • Paint doors, or possibly replace them? I wanted to paint them black but I'm not sure if I still want that
  • Replace banged up door hardware with something pretty
  • Refinish hall cabinet doors
  • Replace hall cabinet hardware

Master Suite Remodel - Finished Closet

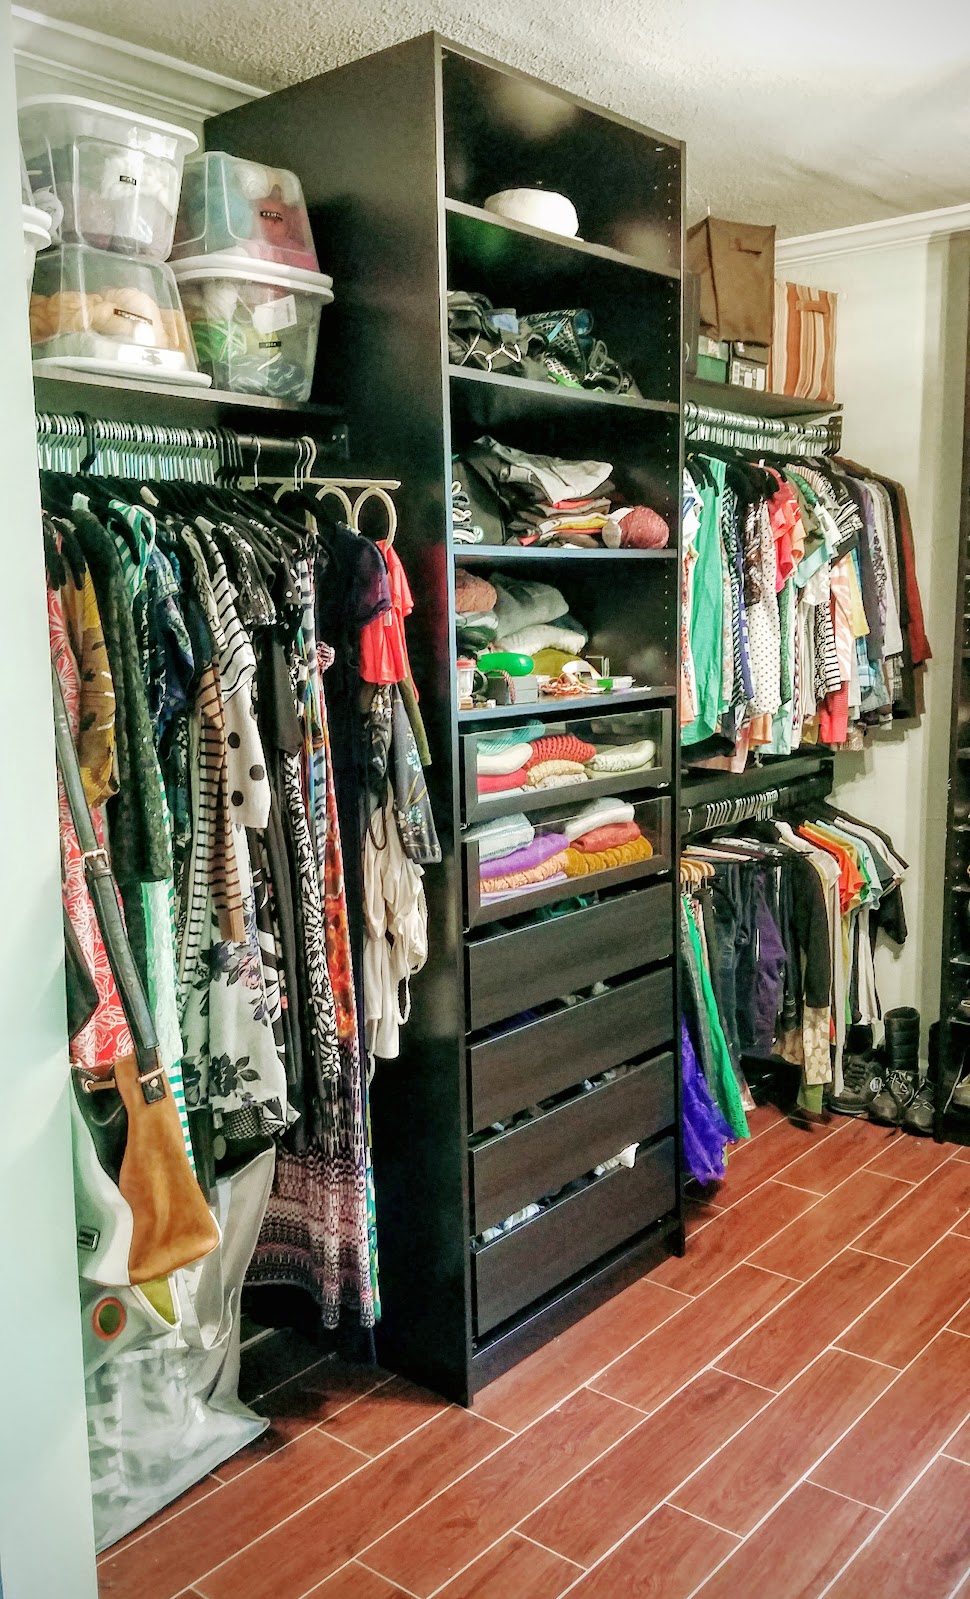
Last post was the bedroom post-remodel, so now we'll see a bit more of a change in the master closet. First, a refresher on what an ugly and terrible waste of space this closet was before:


And now for the much more beautiful and space-efficient after!

The contractors added crown molding for us in the closet so it looks fancy

They also finally reattached the bi-fold closet doors! These door knobs used to be on the bathroom vanity.

 I replaced the blinds with nice white faux wood ones.
My jewelry & nail polish nook

And here is the part that I spent the most time on by far! The contractors removed the partial walls that closed off the closet before, as well as the shelf and rod that were here. Figuring out the most efficient use of space was probably what took the longest since I had to pretty much catalog everything I own and decide how much space it would need. I wanted to reuse the shoe shelf I bought a few years ago (Billy bookcase from IKEA) so I wanted to keep everything else dark wood to match. In the end, I went with a Pax wardrobe from IKEA as the center anchoring point and cut-to-fit shelves and expandable rods from ClosetMaid's SuiteSymphony line. I put together and installed everything myself, save for Nick cutting two of the shelves to size for me. I'm pretty proud of the outcome!

My favorite part is definitely the glass-front drawers that I am now keeping my hand-knit sweaters in. I kept these in boxes before because I had no good place to keep them, and now I get to see them every day and feel inspired to knit every time I'm in here! I made sure to get two so I'll have room to add to my collection. Up on the top left shelf are my boxes of yarn, which I'm also happy to be able to see every day, so I definitely have enough to keep me busy knitting for years.

I also went ahead and replaced all the plastic hangers I had before with new non-slip hangers that are super-thin so that there's plenty of space on all the rods for moving things around. I thought that would be a good way to keep track of how much I have as well -- whenever I find myself at the point where I'm about to run out of hangers, I know I need to get rid of some things.


Long hanging storage on the left, double short hanging on the right

I fit almost all of my shoes in the shoe shelf. I'm still working on paring down further

Pretty knits in my glass-front drawers!

The left side is all mine, and the right side (dresser + hanging storage behind the doors) is all Nick's. 

I really love the light fixture we got in here too!

I love the look of the Edison bulbs but they are terrible energy wasters. I found these LED lookalikes that are almost indistinguishable from the incandescent versions!

For a quick recap of what's been done and what we still want to do in here:
  • Paint walls Sherwin Williams White Mint
  • Replace carpet with tile floors - remodelers did this for us
  • Replace scrawny baseboards - remodelers did this for us
  • Replace ugly crown molding - remodelers did this for us
  • Replace light fixture - remodelers did this for us
  • Reattach bi-fold closet doors - remodelers did this for us
  • Replace ugly cheap blinds with wood or faux wood blinds
  • Find a good soft rug, maybe round
  • Hang the final shelf on the left side - this is just me being lazy really

Master Suite Remodel - Finished Bedroom

The bedroom saw the least amount of changes during the remodel, but it still looks nice enough at the moment that I thought I should take some pictures before it gets filled with our accumulating junk again! There are still lots of little things to do (hang art, organize bedside table better, etc.) but those are always never-ending anyway. First, a fun reminder of what this room used to look like!

Pretty much the most boring room ever.

And now for what it looks like today, after I finally finished painting the walls navy blue.

Pretty new room 

My bedside table, which needs some help still, but hey, it's functional and has a pretty lamp!

Bookshelf with all its pretty contents back where they belong


We set up this desk on Nick's side that he can use as a bedside table/office space for working from home

The art sitting on the desk will go somewhere, it just can't sit on the floor or else the Roomba will try to eat it

A nice blank wall for hanging art! And a good wall for covering up because the texture on it from before is somewhat awful.

And around the corner is the bathroom, which you'll see more of in the next post!

For a quick recap of what's been done and what we still want to do in here:
  • Paint walls Sherwin Williams Naval
  • Replace carpet with tile floors - remodelers did this for us
  • Replace scrawny baseboards - remodelers did this for us
  • Take down curtains & curtain rods
  • Replace fan with a low-power modern one
  • Replace door hardware with oil-rubbed bronze (+new locks)
  • Hang art
  • Find a good comfy rug for under the bed
  • Add cellular shades to the French doors to filter that pesky morning sunlight that shines directly in our eyes in the summer mornings
  • Crown molding? This will be tricky because of the layout of the room and its continuity with the bathroom walls

Sunday, February 14, 2016

Master Suite Remodel - Almost There

Marble hex tile floors

Ceramic and marble subway tile walls

I love this herringbone pattern!

Dimmable recessed lighting

New vanity with our "Dallas White" granite

New lights above the vanity -- a better picture to come later hopefully

Closet painting in progress, light installed, baseboards and crown molding done!

Sunday, January 10, 2016

Master Suite Remodel - Progress

They added drywall around the HVAC intake to make it more finished

The closet partial walls have come down! And the wall and ceiling drywall has been patched.

Plumbers came and moved the drain that was previously for the tub into the center of the new shower room

Tile floors are happening!

Drywall patching finished and tiles down in the closet!

Drywall up in the bathroom!

And tiling has started here too

Look! A door!

Inset cubbies for our shower things